• Email
    • Facebook
    • Instagram
    • Twitter

The Weekday Kitchen

The Weekday Kitchen

  • The Weekday Kitchen
  • Home
  • Random Musings
  • What I’m Cooking
  • Things I Love
  • About

Search Results for: nanas

Sweet And Sour Meatballs

August 2, 2021 by Angela Leave a Comment

These chicken meatballs should really be called sweet, sour and spicy because I banged up the flavor with some red pepper and cayenne (we love the combination of sweet and spicy…if you do not, please do omit the peppers!) The meatballs have a beautiful complex set of flavors that compliments the sauce very nicely.

For the meatballs- Ingredients:

  • Ground chicken- I chose chicken because I didn’t want to overpower the flavor of the sauce.
  • Chinese Five Spice Powder– an easy way to add a pow of Chinese flavor
  • Sesame Seeds and Sesame oil- just a little of the oil. It goes a long way but adds a depth of flavor
  • Watkins Chicken Base- increases the umami
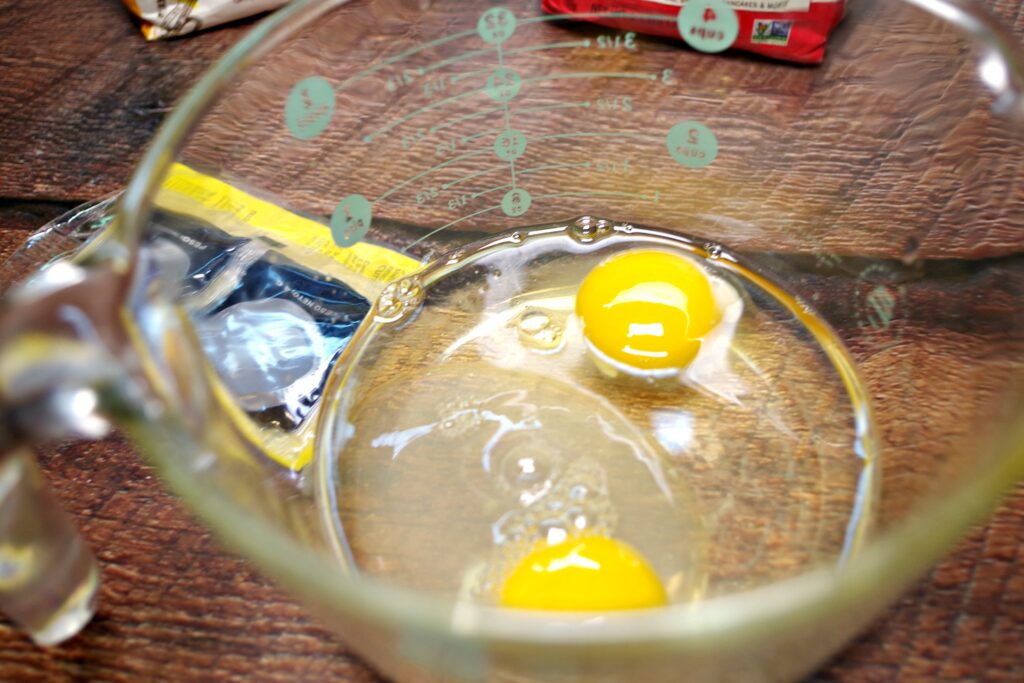
  • Panko bread crumbs and an egg- Panko has a light flavor and texture and between the 2 they help bind the meat
  • Maggi Seasoning– also increases the umami
  • Dried onion and garlic powder- also contributes to umami
  • Finely diced green onion
  • Ginger because…YUM
  • Crushed red peppers- if you like it spicy like we do!

Meatball instructions:

This is pretty easy. Combine everything and cook. This can be done the day before (and in fact the meat will feel pretty wet when it’s combined, but overnight the Panko soaks up the liquid, making them easier to roll into meatballs).

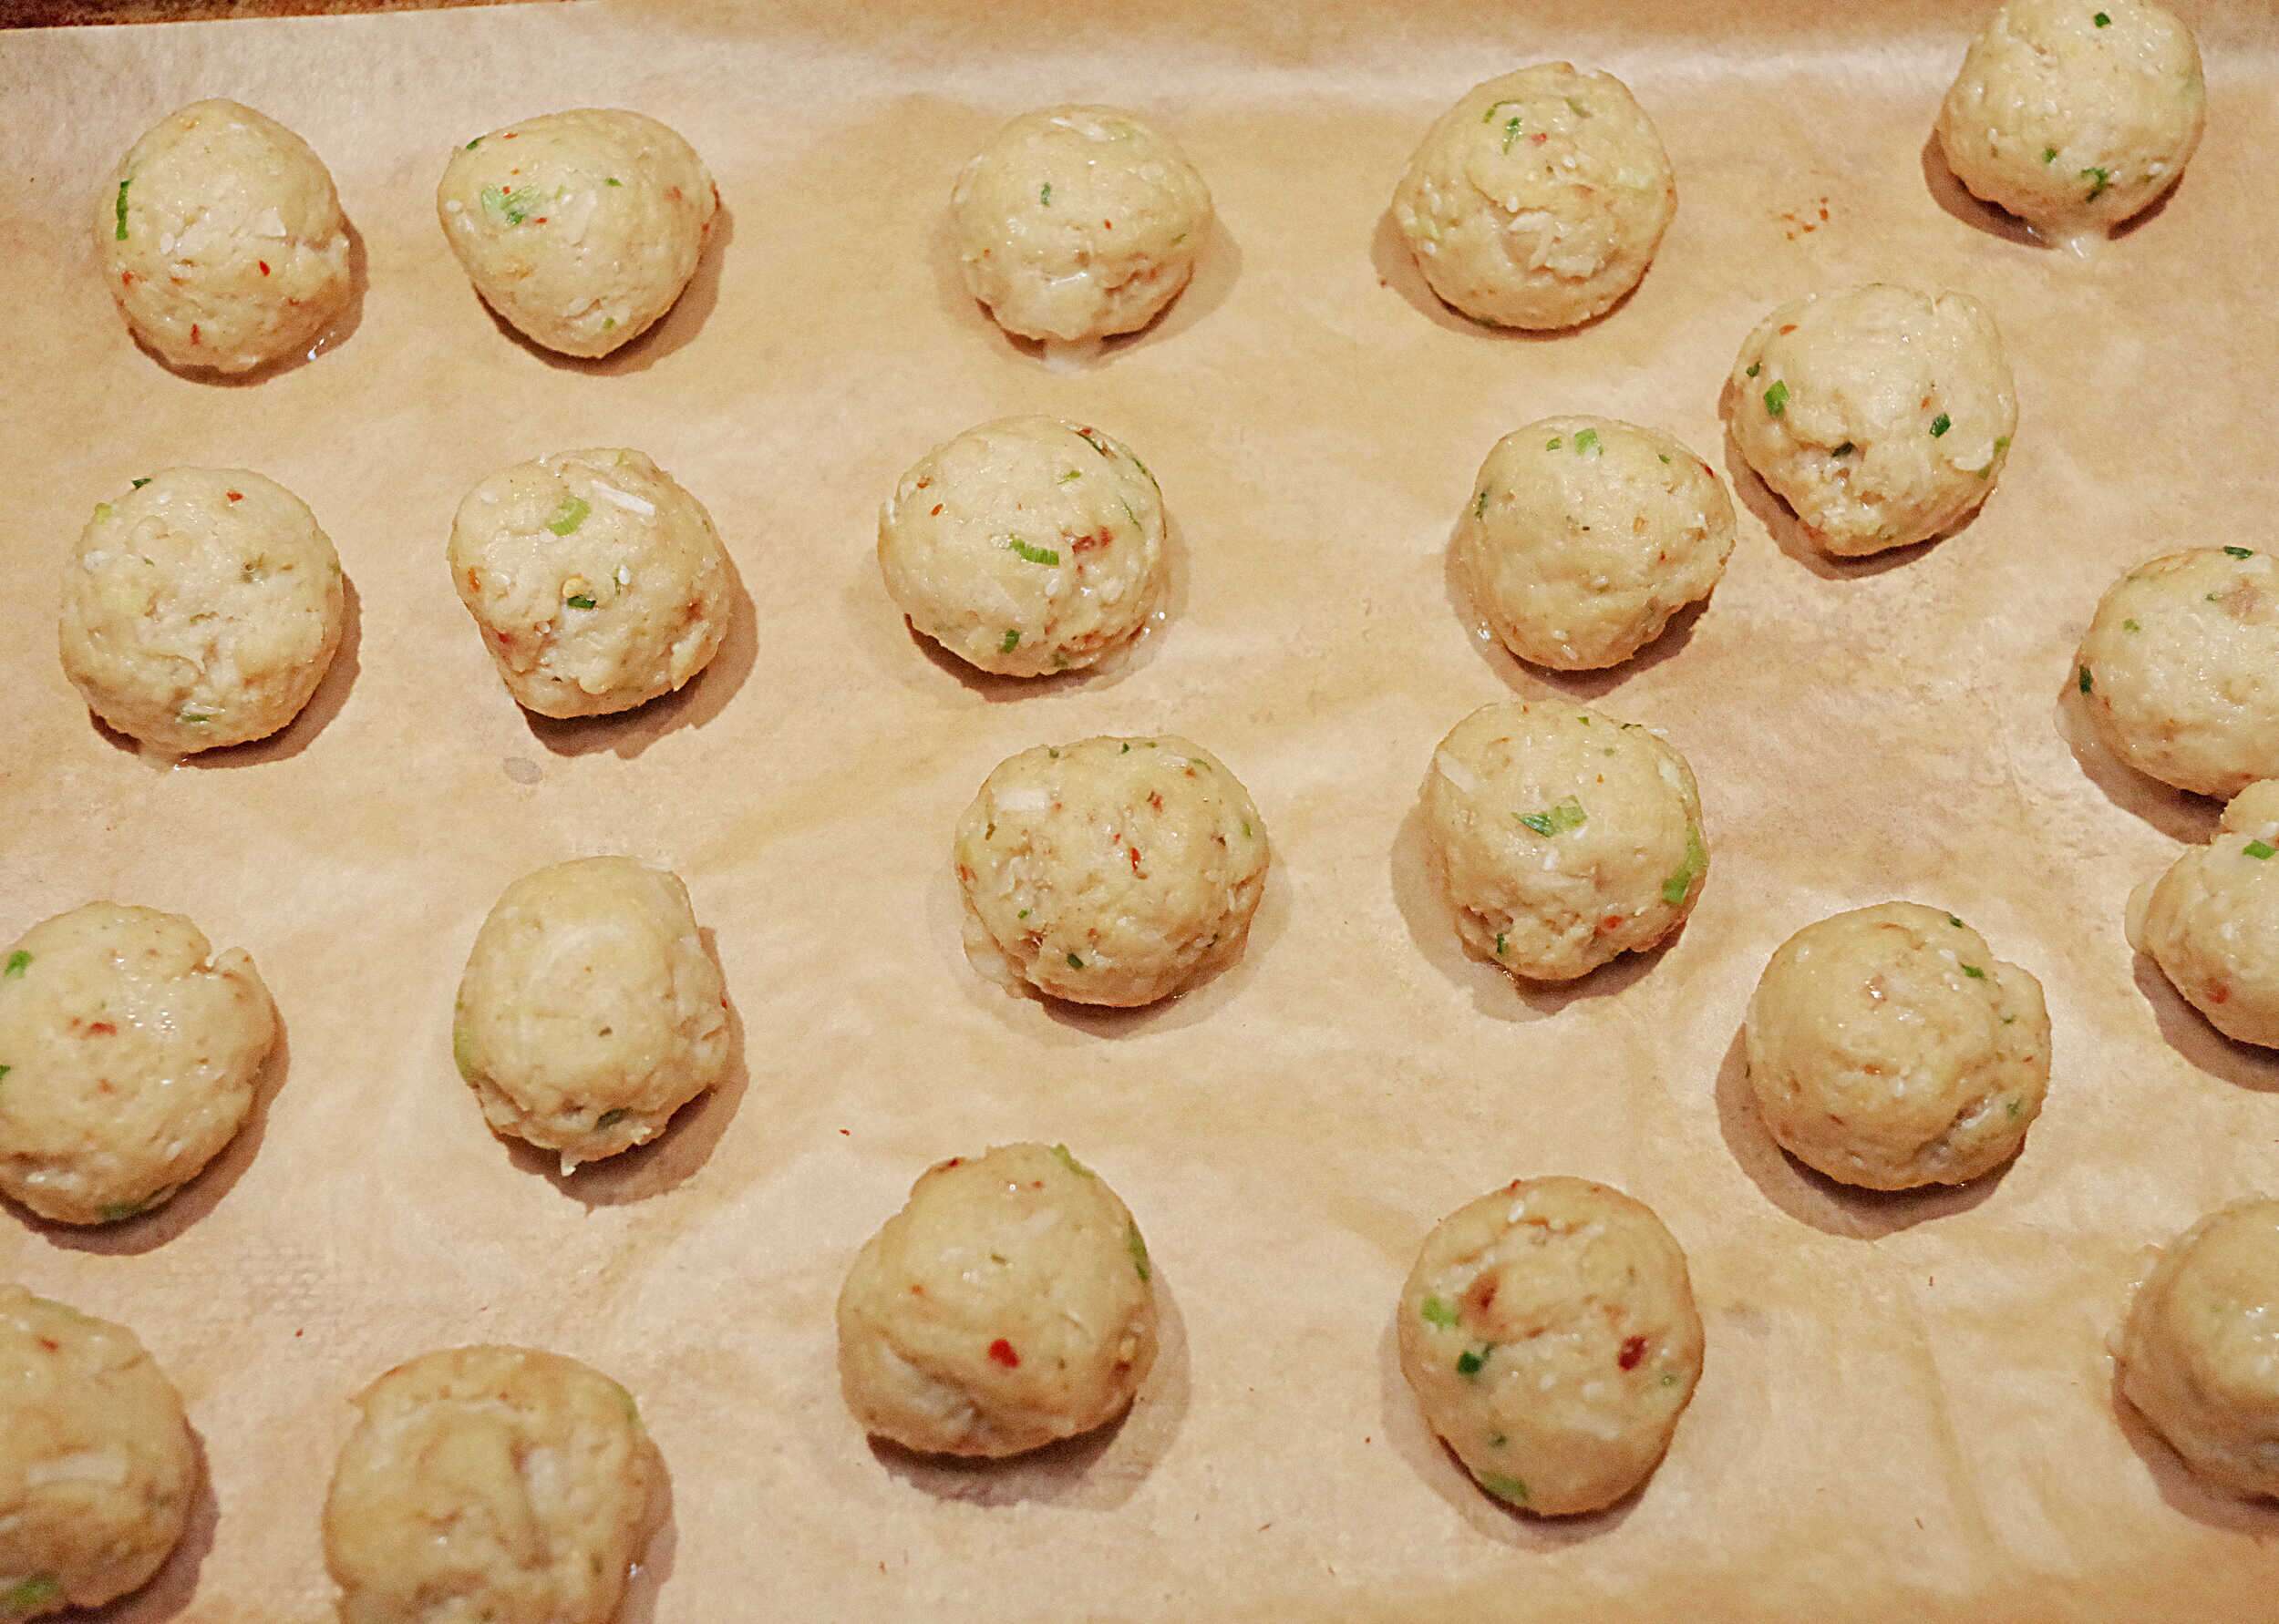
Form into meatballs and bake in a 350 degree Fahrenheit pre-heated oven for 11 to 12 minutes, just enough to set the outside. The rest of the magic happens in the sauce!

For the sauce ingredients:

  • Ketchup. Yup I said it. Sweet and sour sauce isn’t really a traditional Chinese sauce, it’s more of an American invention, and a friend whose family owns a Chinese restaurant verified this for me. The Hunt’s Natural is the best commercial ketchup I’ve ever had (sorry Brooks, it’s just better)
  • Pineapple with juice
  • Vinegar. I used cider but you could use white as well
  • Soy sauce. Use the good stuff!
  • Corn starch does the heavy lifting of thickening the sauce
  • More peppers! Again, omit if you’re not a spicy person!

Sauce instructions:

Add cornstarch to the water, and add remaining ingredients. Turn the heat to medium and cook until translucent, this should take about 10 to 15 minutes. If you’re lazy like me (or really, multi-tasking) set it to low and let it go 20 to 30 minutes, checking ever so often.
Again, the sauce can be made in advance, I made it 2 days ahead of time.

For the finished dish:

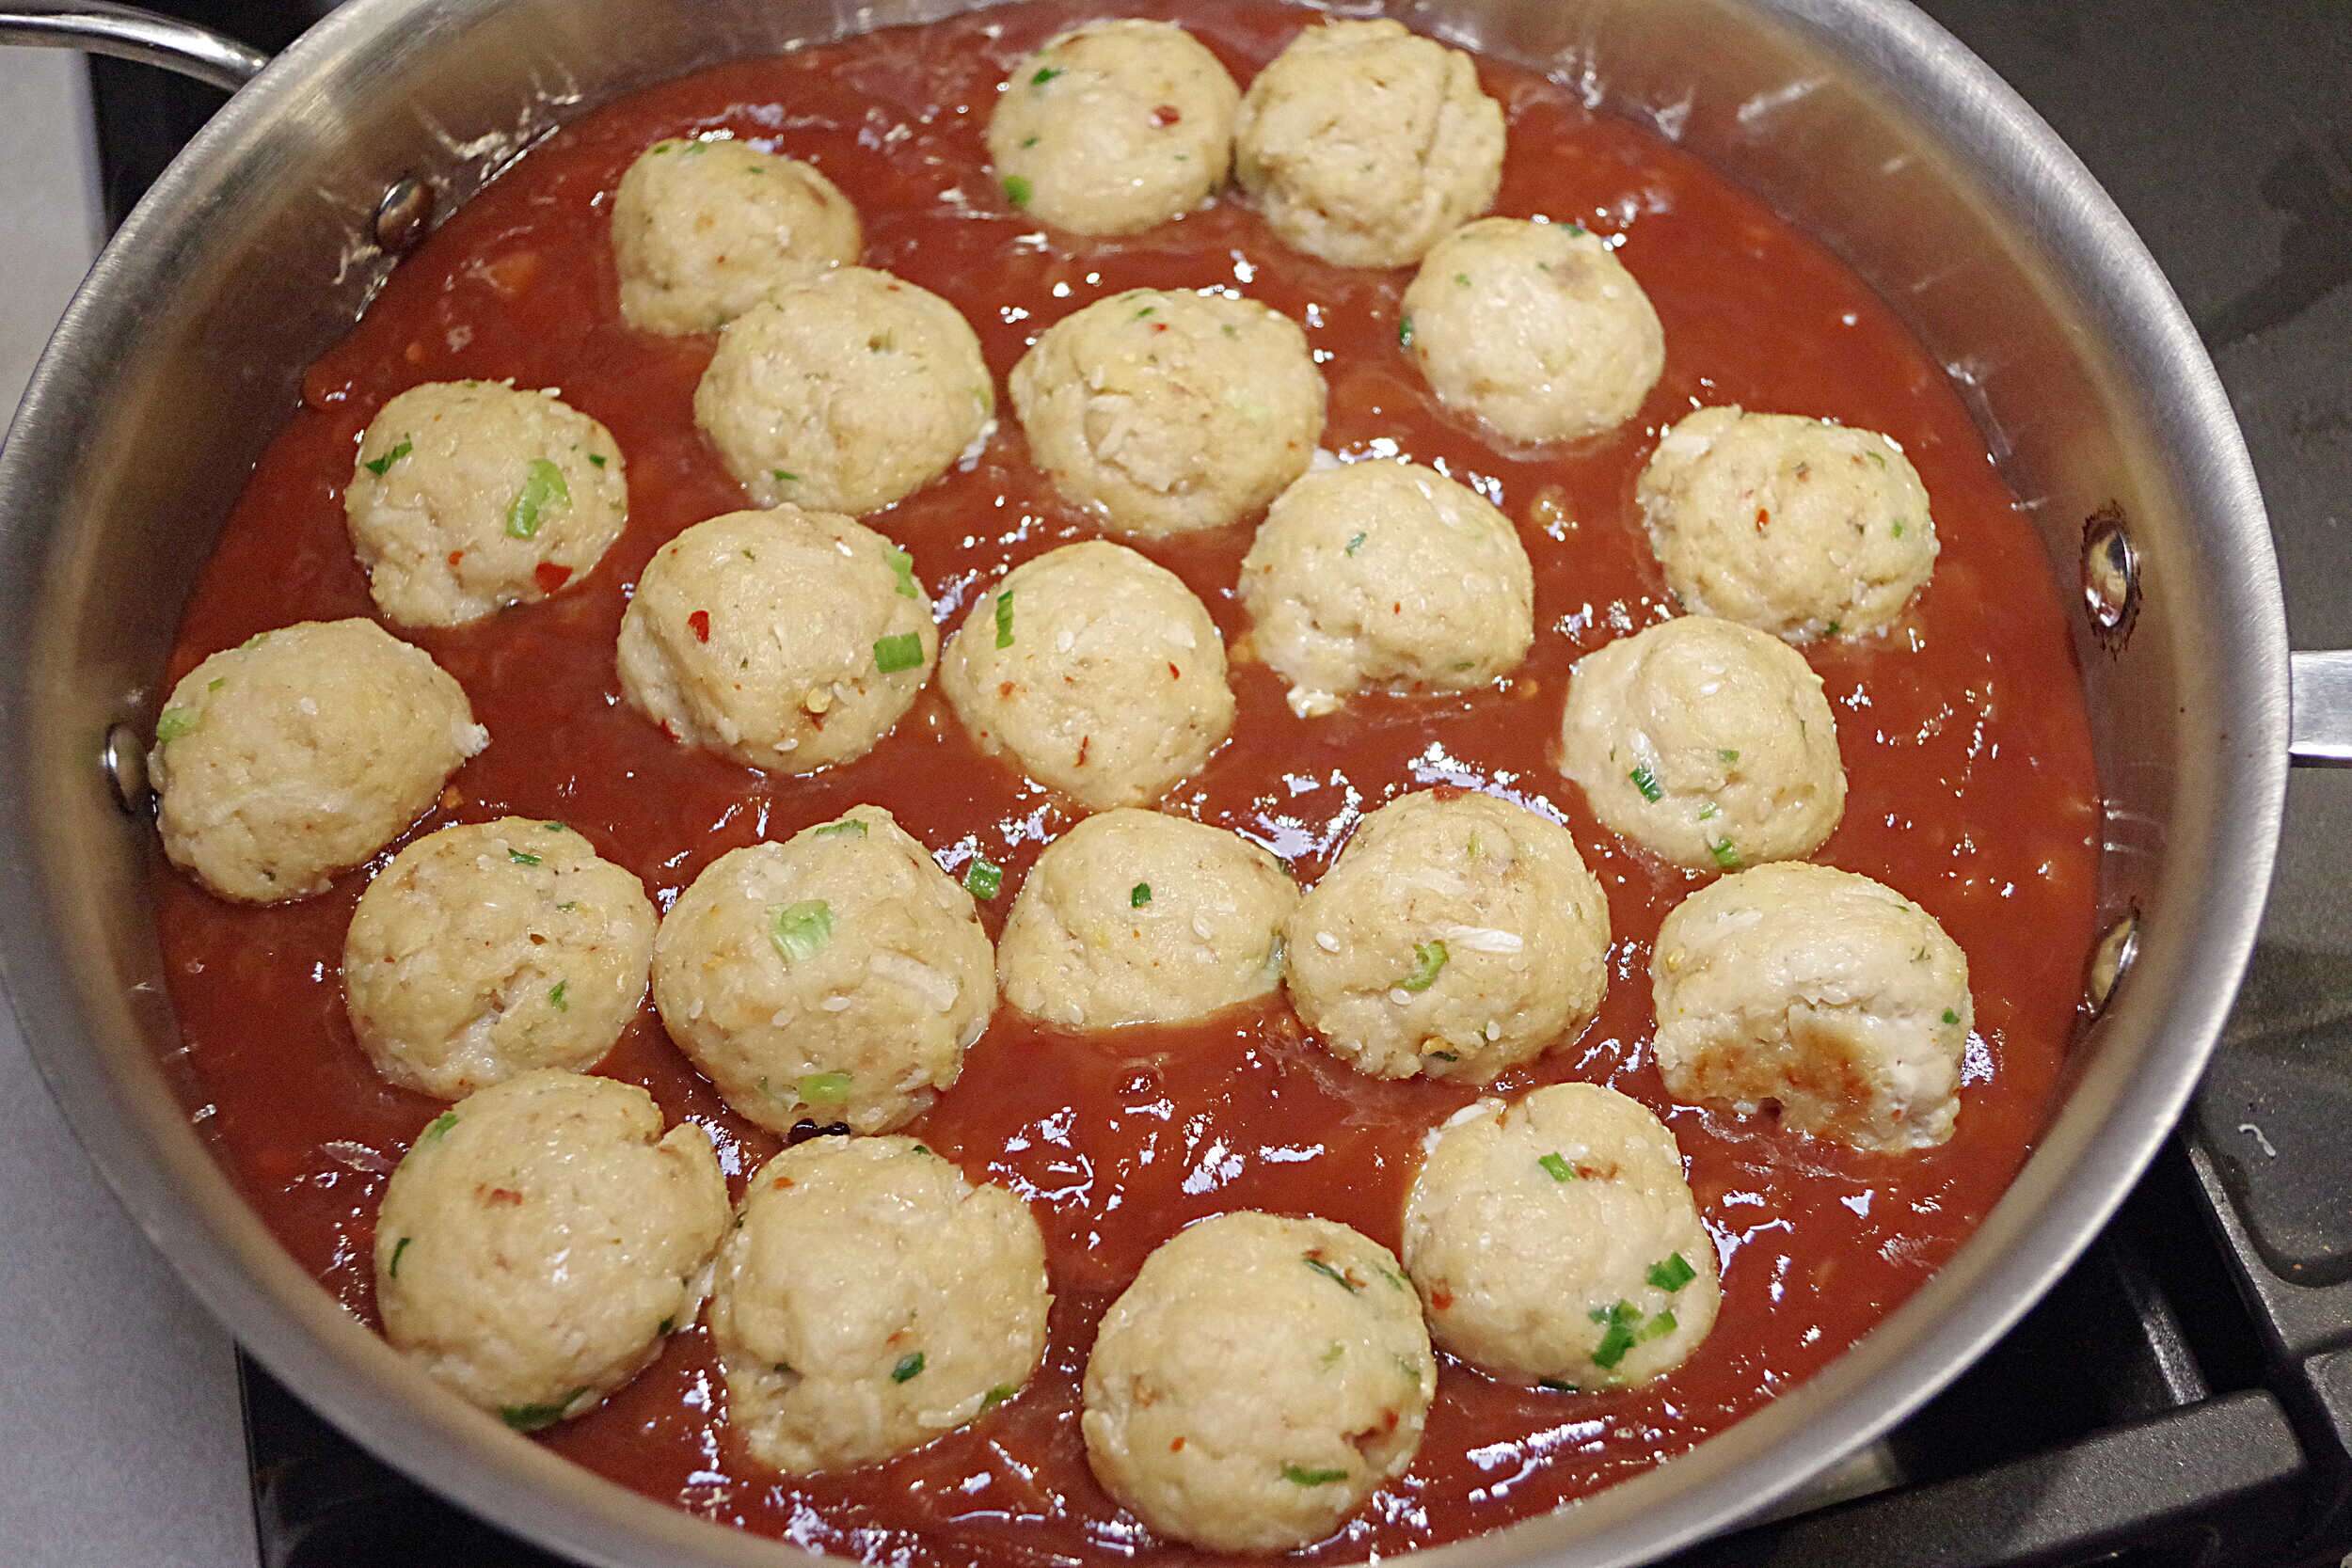
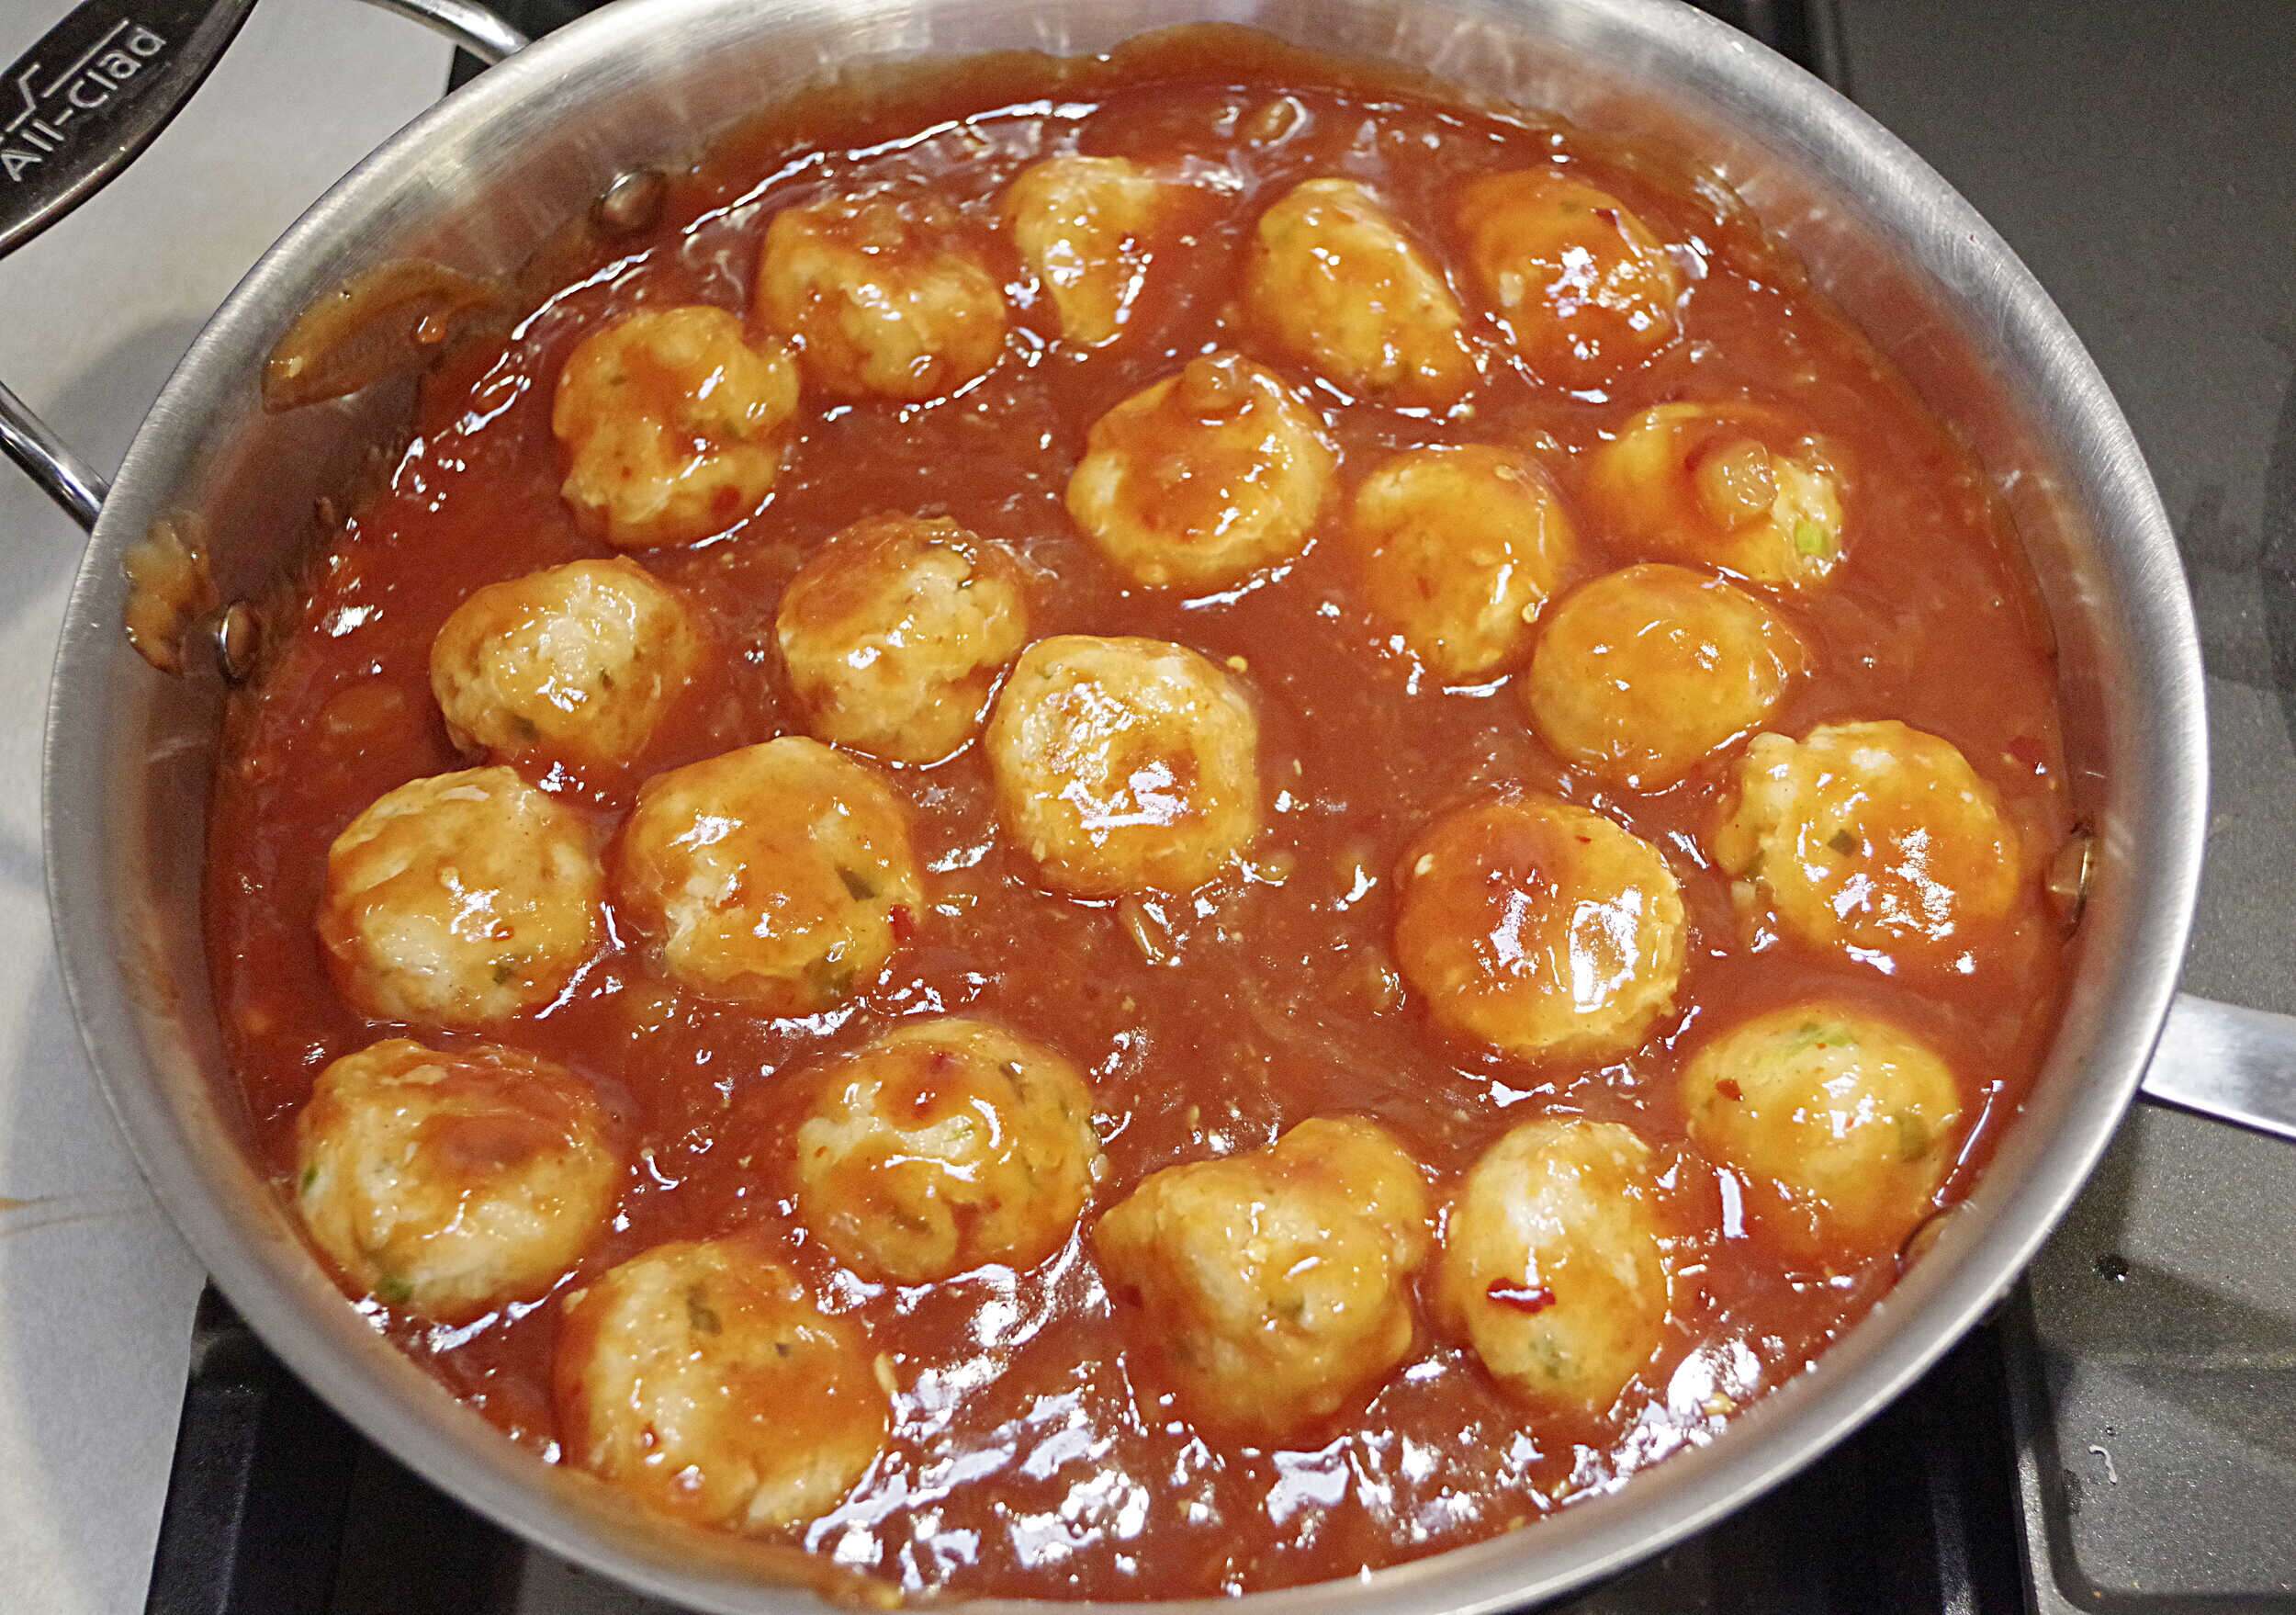
Add the par-cooked meatballs to the pan over medium heat and cook until they’re firm, about 20 minutes. Again, I started low and had a cocktail so mine were more like 30 minutes. Either way works!

Cut up some veggies…here I used Bermuda onion, peppers, and celery but you could do carrots too!

Add the veggies to the pot and stir. Cover and cook until the veggies are to your desired doneness. We like them crunchy so I did about 10 minutes covered.

And serve with rice…

IF YOU LIKE THIS RECIPE YOU WILL ALSO LIKE:

  • Instant Pot Meatballs With Mushroom Gravy
  • Instant Pot Triple Mac and Cheese
  • Instant Pot Johnny Marzetti
  • Instant Pot Beef Stroganoff
  • Instant Pot Buffalo Chicken Mac and Cheese
  • Instant Pot Chicken Tetrazzini
  • Half-healthy Zucchini Lasagna
Print Recipe
No ratings yet

Sweet and Sour Meatballs

These meatballs are sure to satisfy! With a sweet, sour and a bit spicy flavor, you'll wish you'd doubled the batch!
Prep Time30 minutes mins
Cook Time40 minutes mins
Course: Main Course
Cuisine: American
Servings: 22 1 inch meatballs

Ingredients

For the Sauce

  • 1 cup water
  • 1 1/4 cups white sugar
  • 1 cup ketchup
  • 1 8 ounce can crushed pineapple, undrained
  • ⅔ cup distilled white vinegar
  • 1 teaspoon red pepper flakes to taste (these are spicy. Omit if you do not like spice)
  • 1 tablespoon soy sauce
  • 1/2 teaspoon cayenne pepper to taste (these are spicy. Omit if you do not like spice)
  • 3 tablespoons cornstarch
  • 2 tablespoons maraschino cherry juice

For the Meatballs

  • 1 pound extra lean ground chicken
  • 2 tablespoons dried onion
  • 1 teaspoon onion powder
  • 1 tablespoon chicken base
  • 1 egg
  • 1/4 teaspoon Five Spice powder
  • 1 teaspoon red pepper flakes
  • 1 tablespoons Maggi sauce
  • ⅓ cup skim milk
  • ¾ cup panko bread crumbs
  • 2 finely chopped green onions
  • ½ teaspoon sesame oil
  • 2 tablespoons sesame seeds

For the final dish

  • ½ cup chopped Bermuda onion
  • ½ cup chopped orange red and yellow peppers
  • ½ chopped celery

Instructions

For the meatballs

  • Combine ingredients and mix well. Cook in preheated 350 degree Fahrenheit oven for ~11 to 12 minutes, just enough to make the outside sturdy.

For the sauce

  • Add cornstarch to water and stir. Add remaining ingredients and cook on medium heat until sauce thickens and becomes clear (about 10 minutes).

For the dish

  • Add the par-cooked meatballs to the sauce and cook over medium heat for 15 to 20 minutes until they’ve firmed up, turning once. Add the vegetables and cook for 10 to 15 minutes, or until they’re done to your liking, we prefer them to be crisp.

Filed Under: What I'm Cooking Tagged With: Meatballs

Shrimp and Zoodles Scampi

June 23, 2021 by Angela Leave a Comment

With a bit of day-ahead prep, this is a very fast and easy dinner, and surprisingly (even though it’s actual vegetables) the kids really like it!

Ingredients:

  • Zucchini: this can be yellow or green, I did a mix
  • Lemon Juice
  • Garlic and LOTS of it
  • Better than Bullion Lobster Base
  • Sherry
  • Cheap white wine. I’ve heard chefs say “use only wine that you like to drink in food”, i.e. expensive. The truth is that unless you have a VERY trained palate, it’s quite unlikely that you will be able to discern whether a wine is expensive or cheap. There have been multiple studies done where people were told wine was expensive and it was upgraded in sensory evaluation, and vice versa. Drink what you like.
  • Parmesan cheese, grated.

Instructions:

First, make your zoodles. I use the Kitchen Aid Spiralizer attachment and it’s *slick*. I can burn through these babies while I’m setting up the rest of the ingredients.

I personally like to dry my zoodles overnight, it cuts down on the cooking time and I think makes the texture much nicer!

I just put them on a sheet pan, on a rack, and leave overnight in the refrigerator. I really like these Nordic Ware stackable racks, because they keep things from falling through easily.

Cook the noodles with the remaining ingredients, except the shrimp, until they are close to being done to your liking (should take about 10 minutes over medium-high heat) then add the shrimp and cook until just pink *but not curled too much. Curled means overcooked, generally.

And serve with Parmesan and crushed red pepper for a topping. Healthy and delicious!

IF YOU LIKE THIS RECIPE YOU WILL ALSO LIKE:

  • Instant Pot Meatballs With Mushroom Gravy
  • Instant Pot Triple Mac and Cheese
  • Instant Pot Johnny Marzetti
  • Instant Pot Beef Stroganoff
  • Instant Pot Buffalo Chicken Mac and Cheese
  • Instant Pot Chicken Tetrazzini
  • Half-healthy Zucchini Lasagna
Print Recipe
No ratings yet

Shrimp and Zoodles Scampi

Prepping ahead the day before makes this a very quick (but healthy and satisfying) weeknight meal!
Prep Time15 minutes mins
Cook Time20 minutes mins
Dry time1 day d
Course: Main Course
Cuisine: American
Keyword: Zoodles
Servings: 4

Ingredients

  • 6-8 large zucchini squash
  • ¼ cup dry sherry
  • ¼ cup white wine
  • 2 tablespoons lemon juice to taste
  • 5 cloves garlic crushed (to taste)
  • 1 tablespoon Better Than Bullion Lobster Base
  • 1 lb shrimp peeled and uncooked
  • ½ teaspoon dried red peppers for garnish
  • ¼ cup Parmesan for garnish

Instructions

  • Spiralize the zucchini and place on rack overnight in refrigerator to dry. Add the wines and lemon juice to the pan and cook for several minutes on medium-high heat. Add the lobster base and garlic cloves and cook several more minutes until zoodles are almost done to your liking. Add shrimp and cook until just pink through. Adjust seasoning using more lobster base if salt is needed. Serve with grated Parmesan and crushed red peppers.

Filed Under: What I'm Cooking

Philips Pasta Maker Seafood Newburg

January 8, 2021 by Angela 2 Comments

I really *love* the pasta that I make with my Philips Pasta Maker, and I’m always trying to come up with new recipes to use it with, so I thought back to my college days, I would go to a restaurant called the Spaghetti Warehouse in Dayton, Ohio. They had a pretty decent sauce, but I wanted to one-up it.

A traditional Newburg (also called Newberg, or Newburgh sometimes) is a sherry cream sauce with an egg or two and cayenne pepper.

For this particular recipe, the meat I used was cooked sous vide style. Cooking this way makes for a perfect texture and doneness, and basically makes all the shrimp taste like lobster, so it’s also a money saver. Here I used 2 lobster tails and a pound of shrimp. The shrimp is from Great Alaska Seafood, and the lobster is from Get Maine Lobster.

The pasta is a full batch of just the Semolina pasta in the Philips recipe book.

Ingredient Roundup:

  • Sherry: I use sherry in a lot of cooking, I love the intense wine flavor it gives.
  • Heavy whipping cream: for a creamy texture
  • Roux base: to make the sauce slightly thick to balance out the liquids in the sous vide bag (you don’t want to wast all that flavor!)
  • Smoked Paprika: for some flavor complexity
  • Cayenne: to give it a *kick*
  • Egg: adds to the richness
  • Better Than Bullion Lobster base: I use this in place of salt to intensify the lobster flavor
  • Seafood stock cubes: made similarly to these chicken bone broth cubes in the Instant Pot, but using leftover shells from shellfish.

First, make your roux base. For any roux that I make, the basic equation is to add butter then double the amount of flour, and cook for a minute after the paste forms. This removes any floury flavor.

Then add the stock cubes (or about half cup water), sherry, spices, garlic, lemon juice, and heavy whipping cream and cook until thickened. Add the liquid from the sous vide bag and cook until thickened (do not boil).

Temper the egg by placing it in a bowl and whisking while adding warm sauce. This will prevent scrambled egg sauce!!

Meanwhile, boil your pasta. This only takes a minute or so with fresh pasta.

Add the seafood to the sauce and warm it through. Toss the pasta in the sauce and toss it all together.

And serve. This is so rich and decadent, and compliments the seafood perfectly!

IF YOU LIKE THIS RECIPE YOU’LL ALSO LIKE:
  • Philips Pasta Maker Lobster and Shrimp Ravioli
  • Philips Pasta Maker Cheesy Crab Ravioli
  • Philips Pasta Maker Squid Ink Pasta
  • Philips Pasta Maker Shrimp and Scallop Scampi
  • Nana’s Sauce
Philips Pasta Maker Seafood Newburg
Print Recipe
No ratings yet

Philips Pasta Maker Seafood Newburg

This decadent, creamy sauce goes perfectly with seafood and fresh pasta!
Prep Time20 minutes mins
Cook Time30 minutes mins
Course: Main Course
Cuisine: American
Servings: 6

Equipment

  • Philips Pasta Maker

Ingredients

  • 16 ounces pasta
  • 3 lobster tails removed from shell
  • 1 pound shrimp peeled
  • 3 tablespoons butter
  • 6 tablespoons flour
  • 3 shellfish stock cubes or ½ cup stock
  • ¼ cup sherry
  • ¾ cup heavy cream
  • 1 clove garlic minced
  • 1 tablespoon Better Than Bullion Lobster Base
  • 1 teaspoon onion powder
  • 1 teaspoon smoked paprika
  • ¼ teaspoon cayenne pepper
  • 3 tablespoons lemon juice
  • 1 egg

Instructions

For the shellfish

  • Add shrimp and lobster to vacuum bag and sous vide for 6 hours at 130 degrees Fahrenheit.

For the sauce

  • Melt butter in large pan. Add flour and cook for a minute. Add garlic, sherry, stock cubes, lemon juice, cream and spices and whisk together (it will be quite thick). Add lobster base. Add shellfish and the liquid in the sous vide bag to the sauce and stir. Add cooked pasta and stir, cooking a few minutes until all is very warm.
  • Alternately to sous vide: you can steam the shellfish until it is cooked and add to the sauce as above but I highly recommend sous vide for the shellfish because it gives more of a lobster flavor to all of the meat, and keeps the meat very tender, even after cooking with the sauce.

Filed Under: What I'm Cooking Tagged With: Philips Pasta Maker

Scallop and Shrimp Scampi

November 14, 2020 by Angela Leave a Comment

This goes great with a batch of Philips Pasta Maker squid’s ink pasta! But you can also buy squid’s ink pasta pre-made here or here on Amazon, or you can use normal pasta, I just use the black because it looks so cool and the kids love it.

This is super easy, though. Just melt some butter in a pan, and add some garlic and saute for just a minute.

Shrimp Scampi Recipe

Add wine, seafood stock (recipe and instructions here), Better Than Bullion Lobster base, the juice of 1 lemon, and pepper and heat through.

Scallop and shrimp scampi

In the meantime, sear some scallops in butter and oil.

Scallop and shrimp scampi

Toss the pasta (that has been cooked in boiling water until al dente) and toss in the sauce.

Scallop and shrimp scampi

Add shrimp to the heated pasta and cook until just cooked through, and toss in the shrimp, and cook until the shrimp is done. Taste and adjust the seasoning (I added more Better Than Bullion Lobster Base for more salt and flavor).

Scallop and shrimp scampi

Toss the scallops in last (they’re delicate) and serve.

Scallop and shrimp scampi

This was amazing!!! The shrimp was purchased from Great Alaska Seafood and the scallops from All Fresh Seafood. I highly recommend them!

IF YOU LIKE THIS RECIPE YOU’LL ALSO LIKE:
  • Philips Pasta Maker Cheesy Crab Ravioli
  • Supper Club Lobster Macaroni and Cheese
  • Philips Pasta Maker Squid Ink Pasta
  • Philips Pasta Maker Shrimp and Scallop Scampi
  • Nana’s Sauce
Scallop and shrimp scampi
Print Recipe
No ratings yet

Scallop and Shrimp Scampi

Scallop and Shrimp Scampi made with homemade pasta from the Philips Pasta Maker
Prep Time25 minutes mins
Cook Time25 minutes mins
Course: Main Course
Cuisine: Italian
Keyword: Philips Pasta Maker
Servings: 6

Ingredients

  • 1 pound shrimp peeled
  • 1 pound scallops
  • 1 pound pasta cooked
  • 1/2 cup white whine
  • 1 cube seafood stock or chicken stock
  • 1 to 2 tablespoons Better Than Bullion Lobster Base
  • 2 tablespoons butter
  • 4 to 5 cloves garlic, minced
  • 1 lemon juice of 1 lemon
  • 1/4 teaspoon black pepper
  • 1/4 cup shredded Parmesan

Instructions

  • Cook the pasta to al dente. In large pan, melt butter and saute for a minute. Add wine, juice of 1 lemon, 1 shellfish stock cube, 1 to 2 tablespoons Better Than Bullion Lobster Base, and black pepper, and cook until heated through. Saute scallops and set aside. Add cooked pasta to sauce and toss, heating through. Add shrimp and cook until the shrimp is just cooked. If more salt is needed, add another tablespoon Better Than Bullion Lobster base. Add scallops and toss to coat. Serve with shredded Parmesan.

Filed Under: What I'm Cooking Tagged With: Philips Pasta Maker

Philips Pasta Maker Squid’s Ink Pasta

November 12, 2020 by Angela Leave a Comment

I wanted to make something very *elegant* for my birthday party. What can be more dramatic than lobster mac and cheese made with black pasta noodles? I have to be honest that the flavor doesn’t change that much, but hey you eat with your eyes right?

This is basically the full-batch (600 gram) Semolina pasta recipe, but with squids ink added. And where might you find squid’s ink? Amazon of course! There are a couple of little tricks.

The squids ink comes like this, I use two packets for the full batch.

Mix the squids ink in with the liquid. It’s going to want to stay in lumps, so either immersion blend it or put it in a bullet blender to break up the clumps. I found that not doing this results in lighter grey pasta with black specs. No bueno!

Add the flour mixture, and start mixing. The dough should look like this. I found I did have to add about 4 tablespoons extra water to make the correct texture. This is when you pinch the dough together in your fingers it holds together. If you start to extrude your pasta and it looks too dry, (or cracking, etc) no worries just throw that back in the bowl, add more water, and re-mix. There can be a lot of difference in the level of moisture in any given flour but over time you get a feel for what the dough is supposed to look like.

After extruded. Now just cook in boiling water for 3 to 4 minutes until done to your liking. I usually don’t salt the water because I’m using other things to salt the dish (like lobster or chicken base) and I want to add flavor and umami along with the overall sodium content.

Now make some wonderful things. Like this Scallop and shrimp scampi.

IF YOU LIKE THIS RECIPE YOU’LL ALSO LIKE:

  • Philips Pasta Maker Lobster and Shrimp Ravioli
  • Philips Pasta Maker Seafood Newburg
  • Philips Pasta Maker Squid Ink Pasta
  • Philips Pasta Maker Shrimp and Scallop Scampi
  • Nana’s Sauce

Filed Under: What I'm Cooking Tagged With: Philips Pasta Maker

Kewpie Chili Shrimp

July 4, 2020 by Angela Leave a Comment

This is so easy and the flavors are an umami bomb.

I read about the gochujang on Two Sleevers and thought oh gosh I have to try this. So I did what I do and clicked on the link and ordered it. As soon as I got it, I opened the bucket and tasted. The flavor is so good…slightly sweet, pretty spicy, lots of umami.

I wanted to blend it with something sweet so I added Sweet Chili Sauce and a little bit of seasoned rice vinegar to add just a bit of tang. I had been reading for quite a while about the wonders of Kewpie Mayonnaise and how much flavor it adds to dishes and the huge pow of umami it gives, so I went ahead and added some of that.

Mix together 1/3 cup each of the Kewpie mayonnaise and chili sauce. Add 3 tablespoons gochujang and 4 tablespoons rice wine vinegar.

Reserve 1/4 cup of the sauce for dipping and add the shrimp to the sauce (about 2 pounds). I got the shrimp off the back of a truck from Fabian Seafood. I kid but it truly is off the back of a truck, and their shrimp is so fresh and incredible. If you live in the midwest, get on their mailing list and they’ll send you a postcard. It’s a fantastic little operation.

Let the shrimp marinate for about an hour.

Skewer them.

And grill for just a few minutes until done. These were outstanding!! My husband made another recipe (there was a pound of shrimp left) but everybody ate these (even my husband).

I also cooked some broccoli in a pan using the sauce that I had marinated the shrimp in and that was fantastic as well! The kids loved it (which is saying A LOT about that sauce!)

IF YOU LIKE THIS RECIPE YOU’LL ALSO LIKE:
  • Philips Pasta Maker Cheesy Crab Ravioli
  • Supper Club Lobster Macaroni and Cheese
  • Philips Pasta Maker Squid Ink Pasta
  • Philips Pasta Maker Shrimp and Scallop Scampi
  • Nana’s Sauce
Kewpie Chili Shrimp
Print Recipe
No ratings yet

Kewpie Chili Shrimp

Major face punch of umami! Kewpie Chili Shrimp
Prep Time15 minutes mins
Cook Time5 minutes mins
Course: Main Course
Cuisine: American
Servings: 4

Ingredients

  • 2 pounds shrimp de-veined and peeled
  • 1/3 cup Kewpie Mayonnaise
  • 1/3 cup Mae Ploy Sweet Chili Sauce
  • 3 tablespoons gochujang
  • 4 tablespoons seasoned rice vinegar

Instructions

  • Mix sauce ingredients. Retain 1/4 cup for dipping after shrimp is cooked. Marinate shrimp in the remaining sauce for about an hour. Skewer shrimp and grill lightly. Serve with dipping sauce.

Filed Under: What I'm Cooking Tagged With: chili sauce

Philips Pasta Maker Lobster & Shrimp Ravioli

June 18, 2020 by Angela 1 Comment

Another great use for the Philips Pasta Maker is ravioli. I had some leftover lobster and shrimp from my lobster and shrimp sous vide so I put it to use.

A very simple recipe.

Chopped up lobster and shrimp (or you could use just shrimp or crab or whatever you fancy) mixed with Ricotta cheese, Parmesan cheese, and Better than Bullion Lobster Base (love this stuff!)

I purchased the lobster at Get Maine Lobster, and the shrimp was purchased at Great Alaska Seafood. I’ve ordered from both multiple times and always had great service and perfect delivery.

For the noodles I used the Philips Pasta maker (the dumpling cutter). I used the Durum Pasta Recipe but I think next time I’ll use the Durum noodle recipe, I feel like that might be a little softer in texture (though I do love the texture of the cooked Durum Pasta recipe, nice and toothy!)

Add a couple of tablespoons of filling at normal intervals and put the top on.

Then press using a ravioli maker.

I could probably have added more but when I’ve done that in the past they tend to break. I’ll try the durum noodle recipe and see if the flexibility allows me to add more.

Then cut. As you can see I wasn’t trying to be too perfect. They still tasted amazing.

To prepare for the finished ravioli, I sauteed some garlic in olive oil.

I started that first because with the fresh pasta, it takes only about 3 to 4 minutes in the boiling water.

And I tossed them in the pan with the olive oil to coat.

This is how I wanted mine, just olive oil, garlic and a sprinkle or Parmesan.

And of course Aaron wanted a red sauce, so I made him a quick one and tossed his in the red sauce.

And a sprinkle of Parmesan and voila, there you are. It actually took me longer to find my ravioli maker than it did to make the rest of dinner (sadly, I found it in the very first place I looked, and exactly where it was supposed to be).

IF YOU LIKE THIS RECIPE YOU’LL ALSO LIKE:
  • Philips Pasta Maker Cheesy Crab Ravioli
  • Supper Club Lobster Macaroni and Cheese
  • Philips Pasta Maker Squid Ink Pasta
  • Philips Pasta Maker Shrimp and Scallop Scampi
  • Nana’s Sauce
Ravioli
Print Recipe
No ratings yet

Philips Pasta Maker Lobster and Shrimp Ravioli

A great use for the Philips Pasta Maker!
Prep Time35 minutes mins
Course: Main Course
Cuisine: Italian
Keyword: Philips Pasta Maker
Servings: 4
Author: Pasta recipes from the Philips Pasta Maker Instruction Manual

Equipment

  • Philips Pasta Maker

Ingredients

For the Pasta- Durum Pasta

  • 400 grams Durum Flour
  • 100 grams All purpose flour
  • 190 grams Liquid: 2 eggs plus water to equal 190 grams

For the Pasta- Durum Noodle

  • 400 grams Durum Flour
  • 100 grams All purpose flour
  • 180 grams water

For the filling

  • 1 /2 cup Ricotta cheese
  • 1/8 cup Parmesan cheese shredded
  • 1/4 to 1 teaspoon Better Than Bullion Lobster base to taste
  • 4 ounces chopped seafood (I used lobster and shrimp)

Instructions

For the Pasta

  • Prepare according to Philips pasta directions. Boil for 3 to 4 minutes until pasta is cooked through.

For the filling

  • Combine cheeses, seafood and better than bullion and mix.

Filed Under: What I'm Cooking

Banana Jam made with caramelized sugar

February 15, 2020 by Angela 1 Comment

I ran across this recipe and thought “how odd”. I’m not particularly fond of bananas but the kids are, and considering the fact that bananas have a “perfectly ripe” stage that lasts for 3.5 minutes (just a little longer than the “perfectly ripe” stage of avocados of 2.5 seconds) I’m always looking for ways to use up the bananas that I put in my freezer when they’re brown. Plus I was intrigued.

Ok. This looks like a nasty mess. This is what the bananas look like after they’re thawed out. Keep the liquid.

Add the water and the sugar to a large heat safe bowl, and put food service wrap on top of it. Poke about 10 holes (I just used a fork) in the top. You want to use a microwave-safe food service wrap. Start heating the sugar water in the microwave on high for 10 minutes.

Start heating the bananas over medium heat.

Add a teaspoon cinnamon, 1/2 teaspoon nutmeg, 1 tablespoon vanilla, lime juice, salt, and 4 tablespoons Myers’s dark rum to the bananas.

Mash and continue cooking the bananas. I like to leave some chunks.

After the 10 minutes in the microwave, it should look like the first picture. Then microwave for 2 minutes at a time until it looks like the final picture.

When your bananas are starting to look slightly translucent and a little redder, they’re done.

Add the caramelized sugar. It will bubble like a mother! So be sure your pan is big enough.

Add to Ball jars. Using this funnel is very helpful!

Fill jars. I *love* these reusable lids for things that don’t have to be water-bath canned.

In all honesty, in spite of being skeptical about this recipe (I sometimes make things just because the recipe is WEIRD) this stuff is AMAZING. It is so good on toast, on biscuits, in a peanut butter sandwich, on French toast. I keep making it over and over, and I love it.

Banana Jam
Print Recipe
No ratings yet

Banana Jam

Surprisingly delicious on toast, biscuits, peanut butter sandwiches, and French toast!
Prep Time10 minutes mins
Cook Time20 minutes mins
Cuisine: American
Servings: 6

Ingredients

  • 2 cups granulated sugar
  • ½ cup water
  • 5 medium ripe or overripe bananas
  • ½ teaspoon salt
  • 1 tablespoon lime juice
  • 1 tablespoon vanilla extract
  • 4 tablespoons Myers’s Dark Rum
  • 1 teaspoon cinnamon
  • 1/2 teaspoon nutmeg

Instructions

  • Add sugar and water to a large heat-safe glass bowl, and cover with microwave-safe food service wrap. Poke about 10 holes in the food service wrap. Microwave on high for 10 minutes. Add bananas to a large pan and heat on medium. Add remaining ingredients to pan and cook. Mash, but leave some chunks. After the 10 minutes in the microwave, cook for 2 minutes at a time until sugar is a pretty caramel color. Bananas are done when they are slightly translucent and reddish. Add caramelized sugar to the pan, and cook for several minutes. Keep in a glass jar for several weeks (although ours is usually gone in several days)

Adapted from The Cooking Channel and thecafesucrefarine.com

Filed Under: What I'm Cooking Tagged With: Banana Jam

Rustic Escargot

August 27, 2019 by Angela 2 Comments

Think Escargot are too fancy for a weeknight meal? Think again.

When I was young, we used to go to a very fancy French restaurant called l’Auberge in Dayton, Ohio where I grew up. In general the food there was very, very fancy, but one of the things I really remember was the very simple way that they served Escargot, in a small pot with a garlic cream sauce, and bread for dipping.

What a lovely place it was.

Many times Escargot is served in the shells. Now, it’s not the shells they actually lived in, it’s just some other random, cleaned shell that you stick them back into, and add garlic butter on top of. I’m not really sure sticking them back in the shell makes them any tastier, and frankly seems like a pain in the rear.

But aren’t Escargot hard to get? Oh no. You can get them right here on Amazon. If you’re lucky to be close enough to a distributor, you can get them same day (or even in 2 hours if you’re near a metropolitan area!)

Melt 2 tablespoons of butter over medium heat.

Drain and rinse your snails well.

Add garlic and cook for a minute or two. I started off with 2 cloves of garlic and added as I went along, for a total of 8. Escargot are supposed to be very garlic-y!

Add 2 tablespoons of Sherry and 1 tablespoon of lemon juice and cook for a minute.

Add 2 stock cubes (or about 1/2 cup of broth if you have it) and 3/4 cup of heavy whipping cream and cook until cooked through. Adjust the seasoning to taste with salt and pepper.

And serve in your tiny pot (or huge bowl. Either way) with some toasted bread to sop up the gorgeous sauce.

IF YOU LIKE THIS RECIPE YOU’LL ALSO LIKE:
  • Philips Pasta Maker Cheesy Crab Ravioli
  • Supper Club Lobster Macaroni and Cheese
  • Philips Pasta Maker Squid Ink Pasta
  • Philips Pasta Maker Shrimp and Scallop Scampi
  • Nana’s Sauce
Rustic escargot in garlic cream sauce
Print Recipe
No ratings yet

Rustic Escargot

Simple Escargot served in a garlic cream sauce.
Prep Time35 minutes mins
Cook Time30 minutes mins
Course: Appetizer
Cuisine: French
Keyword: Cream Garlic Sauce, Escargot
Servings: 2

Ingredients

  • 2 7 oz cans Escargot
  • 2 tbsp butter
  • 8 cloves garlic or to taste
  • 2 tbsp Sherry
  • 1 tbsp lemon juice
  • 2 Broth Cubes or about 1/4 cup canned broth
  • 3/4 cup heavy whipping cream
  • Salt and pepper to taste

Instructions

  • Drain and rinse Escargot well. Saute in butter and garlic on medium heat for a minute, then add sherry and lemon juice and cook for several minutes. Add rest of ingredients and heat until heated through.

Filed Under: What I'm Cooking Tagged With: Escargot in cream sauce

Supper Club Lobster Macaroni and Cheese

July 22, 2019 by Angela 1 Comment

This recipe was inspired by one of my favorite restaurant’s side dish. The Five O’ Clock Steakhouse has this amazing crab macaroni and cheese and I wanted to make something similar.

I’m not going to lie to you, this recipe is OVER THE TOP DECADENT. I mean it’s ridiculous, and I did that intentionally. You’ll notice from the ingredients that it’s rather spendy, as well. However, a side of the crab macaroni and cheese will set you back 17 dollars at the steakhouse. There are some substitutions that can be made to reduce the cost.

For the spices, I used a tablespoon of onion powder, a tablespoon of dried mustard powder, a teaspoon of black pepper, a teaspoon of garlic powder, half teaspoon of nutmeg and half teaspoon of cayenne pepper. The cayenne pepper I use is designated as “low heat” so please adjust to your taste and the type of cayenne pepper you have.

A pound and a half of lobster meat. I ordered this on a Thursday afternoon at around 5 pm from Maine Lobster Direct, and the package arrived to my door by about 10 am Friday morning. The world is an amazing place.

Now obviously a pound and a half of lobster meat is quite a lot (did I mention this is decadent?) I think you could probably get away with a pound, but I was going for over-the-top on this one. I chopped it up a bit smaller than this size.

The cheeses I used Jarlsberg, Gouda, and Havarti, about 2 cups shredded per.

Better Than Bullion Lobster base This stuff is the BOMB. Great flavoring for things like Lobster Bisque and other seafood dishes. I keep it on hand at all times.

One stick of butter. Watch out Paula Dean. Melt this in a pan.

Add 1/3 cup flour to make s roux. Cook for a few minutes to make the raw flour taste go away.

Boil some water and add your pasta. For this pasta I used Maestri Pastai brand, Creste Di Gallo (Rooster’s Comb) pasta.

Your Italian grandmother will probably slap me, but I did not salt the water. The reason for this is I wanted to use the max amount of the Lobster Base. As with all bases, it is relatively salty.

Add the spices to your roux and cook for a minute (it looks burnt but it’s actually just the cayenne and black pepper)

Add 2 cups of milk (I used 2%), 1/4 cup of Sherry (I used dry), 1/4 cup heavy cream, and 2 tablespoons Better Than Bullion Lobster Base. This works better if the milk is warm to hot. I usually heat in the microwave for about 2-3 minutes (until just below boiling) but if you do not, no worries. You just have to cook with the flour and butter combination a bit longer, and stir a bit more diligently, until it thickens with no lumps.

Cook until the roux has thickened.

Pasta!! I tend to cook mine a bit more than al dente (again, don’t send your Italian grandmother after me) because it tends to dry out some in the oven.

Add the cheese, about 6 cups shredded. I really liked this cheese blend because it’s similar to what I use in fondue, and with the sherry, nutmeg and cayenne it does have a very fondue-ish flavor. Of course you could use white cheddar or something similar but I really like this combination of cheeses.

Cook and stir until melted.

Add the pasta to the pan.

Chop slightly and add the amazing lobster. How much you chop it depends on how big you want the chunks to be. No one’s going to complain however you do it, I guarantee.

Mix well.

Nom nom nom.

Add the mac and cheese to a casserole and top with a mixture of panko breadcrumbs and melted butter. It would be about 2 cups of panko mixed with about 4 tablespoons of butter.

Bake at 350 for 30 minutes with foil on top, then under the broiler for a couple of minutes (watch this carefully it can literally go from white to burnt black in a matter of minutes).

Soooo good.

The first time I made this there was absolute silence as we started eating it, then many exclamations.

Or you can make it with homemade squid’s ink pasta, made in the Phillips Pasta Maker. Get the cuttlefish ink here.

IF YOU LIKE THIS RECIPE YOU’LL ALSO LIKE:
  • Philips Pasta Maker Cheesy Crab Ravioli
  • Philips Pasta Maker Lobster and Shrimp Ravioli
  • Philips Pasta Maker Squid Ink Pasta
  • Philips Pasta Maker Shrimp and Scallop Scampi
  • Nana’s Sauce
Lobster Macaroni and Cheese
Print Recipe
No ratings yet

Supper Club Lobster Macaroni and Cheese

Decadent and amazing! Three cheese and lobster
Prep Time1 hour hr
Cook Time30 minutes mins
Course: Main Course
Cuisine: American
Keyword: Lobster Macaronin and cheese
Servings: 8

Ingredients

  • 16 oz pasta
  • 1.5 lbs lobster I used claw and knuckle meat this time but have used raw tail meat in the past and that worked just as well
  • 1 stick butter
  • 1/3 cup flour I used AP
  • 2 cups milk
  • 1/4 cup heavy cream
  • 1/4 cup sherry
  • 1 tablespoon onion powder
  • 1 tablespoon dried mustard powder
  • 1 teaspoon garlic powder
  • 1 teaspoon black pepper
  • 1/2 teaspoon cayenne pepper
  • 1/2 teaspoon ground nutmeg
  • 2 tablespoons Better Than Bullion Lobster Base
  • 6 cups shredded cheese I used Jarlsberg, Havarti, and Gouda

For topping:

  • 2 C Panko breadcrumbs mixed with 4 tablespoons melted butter

Instructions

  • Cook pasta until al dente. Melt butter in pan and cook for a minute until bubbly. Add flour and cook for a minute. Add milk and sherry and spices and heat until thickened. Add cheese and heat until melted. Add cream and lobster base and heat through. Add pasta and lobster to pan and heat through. Add all contents of pan to a 9X13 casserole. Mix melted butter and panko breadcrumbs and add to the top. Bake for 30 minutes at 350 covered with foil. Broil under a low broiler for about a minute, just enough to toast the breadcrumbs.

Filed Under: What I'm Cooking Tagged With: lobster, Lobster Mac and Cheese

  • 1
  • 2
  • Next Page »

About me

Hello, I’m Angela!
Welcome to The Weekday Kitchen, a blog to document my cooking techniques to share with my children. This is the modern equivalent of my grandmother’s handwritten recipes. They can no longer read cursive so…

Loading
wordpress com stats

theweekdaykitchen

Happy Wing Day y'all! 🍗⁠ ⁠ Honey and Black Happy Wing Day y'all! 🍗⁠
⁠
Honey and Black Garlic Chicken Wings! So gooey and delicious! Tons of umami and a kick of Gochujang!⁠
⁠
Right click here for recipe, or check out my linkinbio!⁠
⁠
https://bit.ly/3osMBRW⁠
⁠
#nationalchickenwingday #blackgarlic #umami #umamibomb #chickenwings #wings #delicious #spicy #friedchicken #chicken #gochujang
What is Pi? ⁠ The number π is a mathematical co What is Pi? ⁠
The number π is a mathematical constant, approximately equal to 3.14159. It is defined in Euclidean geometry as the ratio of a circle's circumference to its diameter...⁠
⁠
apple pi, cherry pi, pecan pi, pumpkin pi, pizza pi...Whatever it is hope you're having a wonderful Pi day!! 💓⁠
⁠
Right-click here for the easiest pie crust ever: https://bit.ly/2Wc90FK⁠
⁠
#piday #pi #pie #happypiday #pieday #baking #instagood #foo #homemade#letthemeatpie #dessert
I feeling a bit under the weather today...time for I feeling a bit under the weather today...time for some homemade comfort food? I think so. With stock made in the @instantpotofficial this recipe is sure to bring on the comfort, while being much faster and easier. ⁠
⁠
Recipe here⁠
⁠
https://bit.ly/2VMqaN6⁠
⁠
And all recipes and instructions can be found on my Linkinbio page!⁠
⁠
⁠
#comfortfood #foodi#homemade #foodstagram #yummy #delicious #homecooking #foodblogger #cooking #foodiesofinstagram #yum #soulfood #instantpotrecipes #instantpotchallenge #pressurecooker #instantpotlove #instantpotcooking #instapot #pressurecooking #instantpotmeals
We eat A LOT of guacamole. Like, a lot. Every once We eat A LOT of guacamole. Like, a lot. Every once in a while it's nice to have something just a little different and this hits the spot. 🥑🥑⁠
⁠
Avocados, feta, tomatoes and fresh basil. It's a really amazing flavor combination, so fresh and tasty. ⁠
⁠
Recipe here⁠
⁠
https://bit.ly/3ywJzjT⁠
⁠
And all recipes and instructions can be found on my Linkinbio page⁠
⁠
⁠
#avocado #food #foodie #avocadolover  #foodblogger #salad #homemade #guacamole #recipe #recipes #homemade #feta
I never knew how serious Friday Fish Fry was in Wi I never knew how serious Friday Fish Fry was in Wisconsin until I moved here. It is legit serious. 🐟⁠
Every restaurant, regardless of type of restaurant, has a fish fry on Friday nights. Pizza place? Fish Fry. Supper Club? Fish Fry. Mexican joint? Fish fry. The Journal Sentinel has an article online showing “The 43 best Friday Fish Fry’s” in Milwaukee. THE FORTY THREE BEST. 😆⁠
⁠
Of course you must make it with beer and @coorsbanquet is perfect for this recipe! ⁠
⁠
↔️ Swipe to see the steps...⁠
⁠
Recipe here...⁠
⁠
https://bit.ly/3rXgQlL⁠
⁠
Tartar sauce recipe (you must try this if you love Frisch's Big Boy tartar sauce! You can't get that here, so I have to make it!)⁠
⁠
https://bit.ly/3yphV8l⁠
⁠
And all recipes and instructions can be found on my Linkinbio page!⁠
⁠
⁠
#fishfry #fish #seafood #foodblogger #fishing #friedfish #fishfryfriday #fishlover #homemade #dinner #firdayfishfry #coorsbanquet #banquetbeer #cookingwithbeer #beer #beerandfood #foodandbeer #tartarsauce #fishandchips
Do you like curried chicken salad? I had never had Do you like curried chicken salad? I had never had one that I liked (which is odd...I like all the things in it?? but the balance was just never quite right between the curry and the rest of the ingredients, to me. Did I ever mention that I'm picky? 🤣⁠
⁠
So I put this one together. For me, the balance of curry, sweet and tangy turned out perfect, and it was a great dinner on a 90 degree day! Completely hit the spot. ⁠
Could it have been the Duke's Mayo? Possibly so. ⁠
@dukes_mayonnaise⁠
⁠
Recipe here⁠
⁠
https://bit.ly/3ypqiRr⁠
⁠
And all recipes and instructions can be found on my Linkinbio page. ⁠
⁠
⁠
#dukes_mayonnaise #chickensalad #salad #chicken #lunch #dinner #freshfood #foodblogger #chickendinner #chickenrecipes #recipe #recipes⁠
You know how you have something at a restaurant an You know how you have something at a restaurant and you just can't find it anywhere else, and you have dreams about it, so you have to make it up yourself? ⁠
⁠
We had the best fish tacos I've ever had in my life ⁠
@oscarsmex ...sadly we live far from San Diego so we hatched a plan to copy the smoked fish tacos. They're really amazing!! (we had been frying the fish...this is so much better! The combo of fish, pico and cabbage is out of this world). ⁠
⁠
Used some delicious Walleye my husband caught. 🤗⁠
⁠
So go to Oscars if you can!! Otherwise...recipe here⁠
⁠
https://bit.ly/35UoC6f⁠
⁠
And all recipes and instructions can be found on my Linkinbio!⁠
⁠
#oscarsseafoodtacos #oscarsmexicanseafood  #oscarsmex #oscarsfishtacos #smokedfish #fishtacos #recipe #foodblogger #walleye #freshfish #fishingrecipes #homemade
Sweet n sour (and spicy because that's the way we Sweet n sour (and spicy because that's the way we do in our house! 🤣) chicken meatballs⁠
⁠
I wanted something a little more complex than sweet and sour that you get carry-out, so I added some ingredients to bang up the #umami and boy did it ever! #umamibomb ⁠
⁠
The meatballs are par-cooked, then finished in the sauce for extra flavor. ⁠
⁠
Recipe here⁠
⁠
https://bit.ly/3xlSljl⁠
⁠
And all recipes and instructions can be found on my Linkinbio page⁠
⁠
#maggiseasoning #maggiusa @maggiusa #meatballs #sweetandsour #homemade #recipe #recipes #foodblogger #instafood
For years I've wanted to try making arancini but w For years I've wanted to try making arancini but was super intimidated because well...food styling just isn't something I'm super great at (I mean I'm working on it!) So I did what I do and got the right tool for the job, and soon I was cranking them out and I think they turned out *prettY* good?⁠
⁠
And making the risotto in the Instant Pot is like a miracle, seriously. Stirring for an hour? Fuggedaboutit. 6 minutes on high and 5 minutes natural release, and BAM. ⁠
⁠
↔️ To see steps⁠
⁠
Recipe and instructions here⁠
⁠
https://bit.ly/3qhWaDU⁠
⁠
And all recipes and instructions can be found on my Linkinbio page!⁠
⁠
#arancini #foodporn #food #italianfood #sicilia #pizza #foodie #sicily #cibo #arancino #italia #sicilianfood #streetfood #arancine #ciboitaliano #delicious #homemade #arancinisiciliani #aranciniballs #buonappetito #italy #arancina #instantpotrecipes #instantpotchallenge #pressurecooker #instantpotlove #instantpotcooking #instapot #pressurecooking #instantpotmeals
You know how much I really love food that comes to You know how much I really love food that comes together fast, but every once in a while, I have to take it low and slow. ⁠
This red sauce recipe was given to me by an authentic Italian grandmother, and it came from her grandmother. The beautiful fond from browning the beef really contributes to the flavor, and the beef cooks until it nearly falls apart in the red sauce. Served with fresh homemade pasta, it's perfection! 🍝⁠
⁠
Recipe here⁠
⁠
https://bit.ly/3yiFeAv⁠
⁠
And all recipes and instructions can be found on my Linkinbio page!⁠
⁠
⁠
⁠
#pasta #food #foodporn #italianfood #foodie #instafood #pastalover #foodblogger #delicious #homemade #spaghetti #italy  #italian #cooking #cucinaitaliana #healthyfood #cheese #italia #philipspastamaker #freshpasta
This is what you meant by "cheesecake" right? 🤣 This is what you meant by "cheesecake" right? 🤣🤣⁠
⁠
It's Wisconsin, we had to ⁠
⁠
More wedding food ideas⁠
⁠
https://bit.ly/3rWfVSN⁠
⁠
And all ideas and recipes can be found on my Linkinbio site. ⁠
⁠
⁠
@westallischeese @Rothcheese @cypressgrovecheese @deercreekcheese @sartoricheese⁠
⁠
⁠
#Rothcheese #buttermilkblue ⁠#NationalCheesecakeDay⁠
#wisconsincheese⁠ #weddingideas⁠
#humboldtfog #cypressgrovecheese⁠
#deercreekcheese⁠
#sartoricheese⁠
#weddingfood
One of my favorite Father's day gifts I've ever gi One of my favorite Father's day gifts I've ever given (really...a gift for *me* 🤣) was the Blackstone Grill. As my husband often does his first reaction was "what the heck did you do now" that rapidly turns into "this thing is awesome", and it IS. ⁠
In my opinion it's the only way to make smash burgers 🍔, (I mean you need the space, right??) and give the perfect beautiful crust on the burgers. And if you haven't tried @Dat_Ketchup with your fries, you must, because it's amazing. ⁠
⁠
Swipe to see stages of cooking...⁠
⁠
Blackstone grill review and some ideas on the amazing things you can cook on it. ⁠
⁠
https://bit.ly/3nmFOJ7⁠
⁠
All recipes and reviews can be found in my Linkinbio page. ⁠
⁠
⁠
#smashburger #burger #cheeseburger #burgers #smash #hamburguer #food #burguer #burgerlovers #smashburgers #instaburger #cheese #burgerporn #hamburguerperfeito #burgerholic #griddlenation #blackstonegriddle #blackstoneproducts @blackstoneproducts #Dat_Ketchup
Sourdough Cinnamon Raisin Bread⁠ ⁠ I guess I s Sourdough Cinnamon Raisin Bread⁠
⁠
I guess I should call this sourdough-ish because the heavy lifting of the rise is done by commercial yeast. However, adding sourdough starter (fed or discard) and doing an overnight fermentation definitely give you the sourdough flavor, enough to balance out the sweetness of the brown sugar and raisins. Plus a double pow of vanilla with Watkins liquid and powdered vanilla. ⁠
⁠
This is really one of our favorite breads and tastes like a warm hug 🤗⁠
⁠
Recipe here⁠
⁠
https://bit.ly/3zMGzQI⁠
⁠
And all recipes and instructions can be found on my linkinbio page!⁠
⁠
#sourdough #bread #sourdoughbread #levain #artisanbread #baking #realbread #bakery #homemade #wildyeast #sourdoughstarter #sourdoughbaking #breadmaking  #homebaker #breadbaking #homemadebread #fermentation #watkins.1868 @watkins.1868
Muffuletta. Quite honestly the best sandwich I've Muffuletta. Quite honestly the best sandwich I've ever made. Homemade bread (They wanted like 20 dollars to ship it from NOLA. Heck to the no on that).⁠
⁠
Homemade olive salad, and layers of Sopressata, Mortadella, Capocollo (gabba gool), Coppa and more olive salad. Wrap it tight, put a weight on top of it and refrigerate overnight. TO DIE FOR!! ⁠
⁠
↔️ Swipe to see delicious layers. ⁠
⁠
Recipes here ⁠
⁠
https://bit.ly/3zL2hEt⁠
⁠
and all recipes and instructions for bread and olive salad can be found on my linkinbio page. ⁠
⁠
#NOLAfood #sammich #muffuletta #olivesalad #gabbagool #sandwich #recipe #recipes #foodblogger #feedfeed
An updated classic, this dip has 3 kinds of onions An updated classic, this dip has 3 kinds of onions and all kinds of beefy flavor. You know how I know it's delicious? My husband said "I can't stop eating this" and had it for dessert after dinner (instead of ICE CREAM!!) Ok he's crazy 🙃⁠
⁠
But it is really super tasty and very easy!⁠
⁠
Recipe here⁠
⁠
https://bit.ly/2VbG9nY⁠
⁠
And all recipes and instructions can be found on my Linkinbio page!⁠
⁠
⁠
#appetizer #appetizers #FAGEmyway @watkins.1868 #watkins.1868 #potatochips ⁠
#delicious #yummy #tasty #recipe  #recipes #foodblogger
Anatomy of a slider-⁠ In this case, Italian beef Anatomy of a slider-⁠
In this case, Italian beef sliders. The beef is cooked in beer @millerlite in the Instant Pot @instantpotofficial⁠
⁠
That makes cooking the beef super fast and super tender. Pile it all high with cheese, a super tangy sauce, and Cento hoagie spread (if you have not tried this, it's freaking amazing. I never want a sub without it again) @centofinefoods and of course you need to serve them "dipped" (or I guess you'd say drowned in this case 🤣)⁠
⁠
Take the time you saved on the beef and make the rolls from scratch for next-level ridiculousness. These are a huge hit at parties!⁠
⁠
↔️Swipe to see layers ⁠
⁠
Recipe here⁠
⁠
https://bit.ly/3BxX2cZ⁠
⁠
and all recipes and instructions can be found on my linkinbio page⁠
⁠
⁠
#millerlite #beef #beefitswhatsfordinner #cookingwithbeer #beerrecipes #sliders #sandwich #recipe #recipes #foodblogger #instantpotrecipes #instantpotchallenge #pressurecooker #instantpotlove #instantpotcooking #instapot #pressurecooking #instantpotmeals
Happy #sundayfunday !! Is everybody ready for some Happy #sundayfunday !! Is everybody ready for some #brunchin this morning? ⁠
⁠
I present to you French toast. But this isn't just regular French toast. This one is turned up to 11, with homemade sourdough-ish cinnamon raisin bread (I say ish because commercial yeast does the heavy rising, the sourdough is just for flavor). Soaking the sturdy bread in the egg mixture makes the texture somewhat of a cross between French toast and bread pudding. ⁠
⁠
Served with Dr. Bill's Can and Maple Syrup! @drbillssyrup⁠
⁠
Recipe here⁠
⁠
https://bit.ly/3i25RUU⁠
⁠
And all recipes and instructions can be found on my linkinbio page!⁠
⁠
#frenchtoast #sourdough #brunch #drbillssyrup ⁠
#realbread #sourdoughbread #baking #breakfast #breadbaking #breadmaking #recipe #recipes #foodblogger
Another delicious *and* filling dinner salad. Insp Another delicious *and* filling dinner salad. Inspired by a salad I had at a restaurant which was so unique and delicious. ⁠
⁠
The romaine is just ever so slightly grilled, and the dressing is a nice creamy and tangy horseradish flavored dressing. The three elements really pair up very nicely!⁠
⁠
Recipe here⁠
⁠
https://bit.ly/3kF2Efq⁠
⁠
And all recipes and instructions can be found on my linkinbio page⁠
⁠
⁠
⁠
#yummy #delicious #dinner #yum #eeeeeats⁠
#meat #beef #grilling #grill #meatlover #carnivore #foodpics #protein
I like having a salad *with* dinner, but it's pret I like having a salad *with* dinner, but it's pretty rare that I will have a salad *for* dinner. There just usually isn't enough there to make me feel like I've had a full meal. ⁠
That is definitely NOT the case for this Thai Chicken salad, the chicken and peanuts really give it some body. Also there's the fact that I can't stop eating it because it's so amazing. 😋😋⁠
⁠
Prepping the chicken ahead of time really saves time on a weeknight when I'm trying to keep my crap all together!!⁠
⁠
Recipe here⁠
⁠
https://bit.ly/2UCzVgT⁠
⁠
And all recipes and instructions can be found on my linkinbio page⁠
⁠
⁠
⁠
#healthy #food #fresh #yummy #delicious #dinner #recipe #eeeeeats #veggies #foodblogger
This sous vide pork belly 🐖 🐷 with an Asian- This sous vide pork belly 🐖 🐷 with an Asian-inspired sauce turned out absolutely amazing. ⁠
⁠
➡️Swipe through for the process. ⁠
⁠
The sauce has multiple ingredients that really bump up the #umamibomb flavor to 11. I cooked for 24 hours at 124 degrees Fahrenheit for the perfect silky inside texture, then seared on a hot, hot grill thanks to @vortex_cooking for the perfect crispy outside texture #maillard #maillardreaction ⁠
⁠
Recipe here⁠
⁠
https://bit.ly/3ixyHLI⁠
⁠
And all recipes and instructions can be found on my Linkinbio page. ⁠
⁠
#anovafoodnerd #vortex_cooking #umami #anova #sousvide #pork #recipe #recipes #foodblogger #gochujang #blackgarlic @kikkomanusa #kikkomanhellokitty @chami_yum #chami_yum⁠
Load More... Follow on Instagram

Copyright © 2023 · Sassafras Theme by Hello You Designs

Copyright © 2023 · Sassafras Theme on Genesis Framework · WordPress · Log in